Blog

  • Baby Chicken Bread Recipe

    Baby Chicken Bread Recipe

    The recipe I am sharing today is a Family FAVORITE. All families have certain dishes they love to cook and eat. Mine goes gaga for these baby Chicken Breads! Put 12 dozen in front of them and they’ll still demand more. I am sure you will face the same situation with your siblings, cousins, random guests when you try these magical Baby Chicken Bread. (unless they are gluten intolerant. Oops)

    I thought, I would share this FAMILY FAVORITE with everyone since so many Friends nd ClassFellows have asked for this recipe. Enjoy!

    Baby Chicken Bread
    Photo: Baby Chicken Bread

    Baby Chicken Bread

    Chicken bread is a classic of Pakistani bakeries and we served it at most of the tea parties as a staple here. This simple yet delicious bread is easy to make and full of flavor.

    All you really need is a few basic ingredients: salt, flour, baking soda and yeast etc. The “trick” to achieving a perfect texture is not to over knead the dough and don’t over bake, as this will make it tough & hard, ugh not good! Brush with egg wash. Sprinkle a few sesame seeds. And voila! It’s ready to go in the oven for 25 minutes. 

    Baby Chicken Bread recipe
    Photo: Baby Chicken Bread

    On weekend night, I decided to bake chicken bread from scratch and Just for a twist I made  them in baby sizes.

    Don’t ask me why I do these things. I’m not quite sure myself.

    But you have to admit….they’re pretty darn cute.

     Baby Chicken Bread
    Photo: Baby Chicken Bread

    So now that my kitchen is covered with Baby Chicken Breads, what should I do with them?
    Of course, slathering them with hot pepper sauce and taking a big bite doesn’t count. I already did that. Twice.

    Baby Chicken Bread
    Photo: Baby Chicken Bread

    This recipe is especially handy because it makes A LOT of Baby Chicken Breads (1-1/2 dozen to be exact). So they are the perfect, fuss-free party food. Easy to make, fun to eat.

    Bismillah, Let’s get started!

    Check it out the Baby Chicken Bread recipe and printable version below.


    Baby Chicken Bread Recipe

    Chicken bread is a classic of Pakistani bakeries and we served it at most of the tea parties as a staple here. This simple yet delicious bread is easy to make and full of flavor.
    Prep Time 20 minutes
    Cook Time 25 minutes
    Total Time 45 minutes
    Servings 16
    Author Bushra Waheed

    Ingredients

    For Baby Chicken Bread Dough

    • 4 cups plain flour
    • 1 tablespoon instant yeast
    • 2 tablespoon dry powdered milk
    • 1 teaspoon salt
    • 1 teaspoon castor sugar
    • 4 tablespoon oil
    • 1 egg plus one for glazing

    For Baby Chicken Bread Filling

    • 2-1/2 cups boiled chicken shredded
    • 1 large onion finely chopped
    • 1 teaspoon salt
    • 1 teaspoon black pepper
    • 1 teaspoon garam masala powder
    • 1/2 cup coriander leaves
    • 4 green chilies finely chopped
    • 1 cup milk
    • 2 tablespoon plain flour
    • 2 tablespoon butter
    • sesame seeds & flax seeds as required

    Instructions

    To Make the Baby Chicken Bread Dough

    • In a large mixing bowl combine the plain flour, salt, castor sugar, dry milk powder, instant yeast, oil and egg.
    • Slowly mix in the lukewarm water with your hands till all the ingredients are mixed well and dough starts to form.
    • Knead the dough for 5-7 minutes on a floured surface till the dough becomes smooth and is no longer sticky.
    • Bang the dough on the floured surface 7-8 times for elasticity.
    • Shape the dough in a large ball add place in a greased bowl.
    • Brush the top lightly with some oil.
    • Cover with a kitchen cloth and let the dough to rise somewhere warm until doubled in size, around 1 hour.

    To make the Chicken Filling

    • Meanwhile, Melt butter in a frying pan over medium heat.
    • Fry onion till soft and translucent.
    • Now add 2 tablespoon plain flour and stir well.
    • Season with salt , black pepper and garam masala powder.
    • Stir in the milk and cook for 2-3 minutes or until thickened.
    • Stir in the shredded chicken add chopped green chillies and coriander leaves.
    • Remove from the heat and let it cool completely.
    • Punch the dough to release air.
    • Preheat oven at 200 degree C.
    • Now divide the dough into 14-16 parts depending on how small you want the baby chicken bread to be.
    • Roll each piece of dough to a rectangular shape.
    • Snip the sides with a sharp knife and put chicken filling in the center.
    • Fold each side so they overlap each other (like a braid) the filling will show slightly but that’s ok.
    • Brush top with beaten egg.
    • Sprinkle sesame seeds and flex seeds.
    • Bake, in the preheated oven, for 25-30 minutes or until its turn golden brown.
    • Right after taking out of the oven apply butter well on whole bread and let it rest covered with a cloth for 2-3 minutes to soften the bread completely.
    • Delicious Baby Chicken Breads are ready to serve.

    Notes

    Serving Suggestions:
    Voila! Enjoy your delicious bread with hot tea to the loving and deserving.


     Recipe Tip’s:

    1. I always make big batches of chicken bread at a go and then wrap them well in foil, then put them in some sort of a cellophane bag and tie it up tight and freeze.
    2. They can keep up to 4 weeks! When you need one, you just thaw it out overnight in the fridge or keep it out on the counter until it’s thawed out, then unwrap and then splash a little bit of water using your fingertips on it and put it in the oven for about 5 minutes to freshen it back up. Becomes as good as new! 

    Put your own spin on it. And lemme know how it turns out by sharing a picture  on Instagram, Facebook (Recipestable) or Twitter with this hashtag #Recipestable so I can see how lovely yours turn out.


    Happy Baking!!

    If you like this post, Please Subscribe to my blog and let me know your feedback by commenting below.. I have lots more recipes to share with you.

  • Homemade Veggies Pizza Recipe

    Homemade Veggies Pizza Recipe

    If you need a lighter dish, that doesn’t skimp on flavor, try this Homemade Veggie Pizza recipe. It’s fresh, full of flavor, and won’t weigh you down like the winter comfort food can.

    Homemade Veggies Pizza Recipe

    If you need a lighter dish, that doesn’t skimp on flavor, try this Homemade Veggie Pizza recipe. It’s fresh, full of flavor, and won’t weigh you down like the winter comfort food can.
    Prep Time 1 hour
    Cook Time 20 minutes
    Total Time 1 hour 20 minutes
    Servings 8
    Author Bushra Waheed

    Ingredients

    Whole Wheat Pizza Dough

    • 2-3/4 cups white whole wheat flour or regular whole wheat flour
    • 1 cup water heated to 110 degrees (very warm, almost too hot for comfort)
    • 1 sachet about, 2-1/4 teaspoons instant yeast
    • 1 tablespoon dry milk powder
    • 1 tablespoon sugar
    • 1 tablespoon olive oil
    • 1 teaspoon salt

    Pizza Sauce

    • 1 cup pizza sauce (organic if possible)

    Other Ingredients

    • 1 cup broccoli florets
    • 1/2 cup boiled green peas
    • 1/2 cup sweet corns optional
    • 1 red bell pepper cut into small cubes
    • 1 green bell pepper cut into small cubes
    • 1 carrot cut into small cubes
    • 1 red onion cut into cubes

    Pizza Topping

    • 1-1/2 cup Mozzarella Cheese grated
    • green olives as required
    • fresh or dried herbs i used parsley & basil

    Instructions

    • Whisk water, sugar, oil and yeast in a liquid measuring cup or small bowl. Allow yeast to proof for 5 minutes. It should puff up some by then.
    • Pulse flour, dry milk powder and salt in food processor until combined. While running the food processor, slowly pour in the water mixture and process until a shaggy ball forms, about 1 minute.
    • Dump the dough onto a floured work surface and quickly knead dough a few times until it comes together.
    • Apply some olive oil all over the dough.
    • Cover loosely and keep in a large bowl at room temperature for 1 hour or until the dough will double up and nicely leaven.
    • Meanwhile, toss vegetables in a little olive oil.
    • Add your favorite herbs seasoning and roast 1-2 minutes or until crisp-tender and keep aside.
    • Preheat oven at 200 degree C.
    • Now divide dough into 8 equal balls.
    • Flatten the each ball evenly.For best results, roll the dough out about as thin as reasonably possible.
    • Aim for even thickness rather than a perfectly round shape.
    • Roll out all balls and transfer them into small pizza pans (if your baking pan isn’t non-stick, lightly grease it with cooking spray).
    • Brush the outer 1-inch of the dough with a light coating of olive oil.
    • Spread the pizza sauce on the mini pizza’s.
    • Sprinkle half of the cheese over the pizza sauce.
    • Add vegetables and sprinkle remaining cheese on pizza’s.
    • Top with olives and fresh or dried herbs.
    • Bake on the middle rack until the crust turn lightly golden and cheese is melted & bubbly, about 20 minutes.
    • Remove from the oven and sprinkle some fresh basil and parsley over them.
    • Your Homemade Veggie Pizza is ready to serve. ENJOY!!

    Notes

    Serving Suggestions:
    Serve hot with your favorite dipping sauce.
  • Homemade Veggie Pizza Recipe

    Homemade Veggie Pizza Recipe

    We’ve entered the season of warm comfort food. Soups, Stews, roast meat, etc. And sometimes all that heavy food seems . . . well . . . heavy. 

    Homemade Veggie Pizza

    Just about everyone loves pizza, myself included. However, traditional restaurant pizza is generally made with refined (white) flour, and loaded with saturated fat and sodium – things that can quickly lead to weight gain and harm your health. To make pizza something I can feel good about eating regularly, I’ve found ways to make my own healthier versions. The key is using whole grains, less cheese and loading up on lots of healthy veggies and herbs. Also eating produce that’s in season helps you save money and also ensures you are getting a good variety of foods and nutrients.

    homemade-veggie-pizza3

    This pizza included some of my favorite veggies and herbs: carrots, red onion, broccoli, corn, green or red pepper, olives and fresh basil.  The ingredients only required about 20 minutes of prep time, starting with chopping the veggies and tossing them in a little olive oil for roasting.  Adding a fresh herbs to the veggies adds nice flavor (and makes your kitchen smell amazing during cooking!).

    In addition to its great taste, winter veggies especially broccoli  is  the good sources of dietary fiber and rich in magnesium. Broccoli is loaded with antioxidants, fiber, and numerous vitamins and minerals including magnesium, fol-ate and fiber which are good for health.

    Homemade Veggie Pizza

    While my super-food veggies were roasting I gathered and prepped my other ingredients. The dough only required a thin spread of pizza sauce and cheese to provide creamy texture and cheesy flavor.

    The veggies were done once they were slightly crisped and fork-tender, and I spooned them over the dough. I finished the pizzas off by topping them with the Mozzarella cheese, olives and a sprinkle of herbs.

    Homemade Veggie Pizza
    Photo: Homemade Veggie Pizza

    The last step involves popping the pizzas in the oven – I chose to make veggie pizzas  in individual mini pizza pans. They only needed about 15 minutes to cooked the dough and for the cheese to melt. I loved the contrast of the cheese, olives and herbs with the crunch from the veggies on this flavorful pizza!

    Homemade Veggie Pizza
    Photo: Homemade Veggie Pizza.. Yum 

    If you need a lighter dish, that doesn’t skimp on flavor, try this Homemade Veggie Pizza recipe. It’s fresh, full of flavor, and won’t weigh you down like the winter comfort food can.  Pizzas like this can be enjoyed as a quick and easy lunch or dinner, and make a tasty addition to a healthy diet. Enjoy! 

    Photo: Homemade Veggie Pizza
    Photo: Pizza loaded with cheese and veggies ♥

    Recipe Tip’s:

    1. Feel free to play around a bit with the ingredients in this recipe if you make it yourself.
    2. Add nuts (walnuts, pumpkin seeds), more veggies, would be great, and you could also skip the cheese all-together and instead use the ricotta cheese as the sauce/base.

    Bismillah, Let’s get started!

    Check it out the Homemade Veggie Pizza Recipe and printable version below.

    What other winter-veggies would you try on a pizza?

    Put your own spin on it. And lemme know how it turns out. Post a photo on Facebook (Recipestable) or  on Twitter so I can see how lovely yours turn out.


    Happy Cooking!!

    If you like this post, Please Subscribe to my blog and let me know your feedback by commenting below.. I have lots more recipes to share with you.


  • Pulled Chicken Sandwiches Recipe

    Pulled Chicken Sandwiches Recipe

    Pulled Chicken Sandwiches Recipe

    Prep Time 10 minutes
    Cook Time 25 minutes
    Total Time 35 minutes
    Servings 4
    Author Bushra Waheed

    Ingredients

    For Chicken

    • 500 gm boneless chicken thighs
    • 1 teaspoon grated ginger
    • 1 teaspoon garlic minced
    • 1 teaspoon hot sauce
    • 1 teaspoon paprika
    • 1 teaspoon cumin powder
    • 1/4 teaspoon freshly ground black pepper
    • salt to taste
    • cooking spray

    For Sauce

    • 1 small onion minced
    • 2 teaspoons canola oil
    • 1 tablespoon dark brown sugar
    • 1 teaspoon red chili powder
    • 1/2 teaspoon garlic powder
    • 1/2 teaspoon mustard powder
    • 1/4 teaspoon ground allspice
    • 1/8 teaspoon crushed red chili
    • 1/2 cup tomato ketchup
    • 2 tablespoons apple cider vinegar

    Remaining ingredients

    • 4 burger buns toasted
    • 4 slices Mozarella cheese
    • 1/4 cup cheddar cheese grated
    • ice burg leaves
    • tomato slices
    • olives as required

    Instructions

    To Make Chicken

    • Preheat oven to 200 degrees C.
    • Place chicken in a large bowl. Add ginger, garlic, hot sauce, paprika powder, cumin powder, black pepper and salt.
    • Rub evenly over the chicken.
    • Place chicken on an oven grill rack coated with cooking spray, and bake 20 minutes or until the chicken is nicely browned.
    • Let stand for 5 minutes.
    • Remove chicken from the oven and shred with two forks and set aside.

    To Prepare Sauce

    • While chicken cooked, heat oil in a small saucepan over medium heat.
    • Add onion and cook for 5 minutes or until translucent or, stirring occasionally.
    • Stir in brown sugar, chili powder, garlic powder, mustard powder, allspice and red chili.
    • Cook for 30 seconds then stir in the apple cider vinegar and tomato ketchup.
    • Bring to a boil.
    • Reduce heat to medium low and let it simmer for 10 minutes or until slightly thickened.
    • Now Stir in chicken and cook 2 more minutes.

    To Make Pulled Chicken Sandwiches

    • Place iceberg lettuces and mozzarella slices on the bottom half of each bun.
    • Divide chicken mixture into 4 equal portions and put it on cheese slices.
    • Top each bun with grated cheese, tomato slices and olives.
    • Cover with remaining bun. Delicious Pulled Chicken Sandwiches are ready to serve. ENJOY

    Notes

    Serve on buns, over fresh greens, or on top of a baked potato for a filling dinner. enjoy 🙂
  • Pulled Chicken Sandwiches Recipe

    Pulled Chicken Sandwiches Recipe

    If I ask what my brother wants for dinner, more than likely he will say “sandwiches/burgers.” This recipe is a twist on the usual burgers and packs a big taste punch with the pulled chicken, cheese and barbecue sauce. If you’re anything like me then a burger needs to be covered in cheese, ice-berg leaves, and many slices of olives and tomatoes.

    Pulled Chicken Sandwiches Recipe
    Photo: Pulled Chicken Sandwiches

    Next time you’re craving a burger or sandwich, give this recipe a shot. It will become your new favorite! Your Dinner guests are guaranteed to be impressed with this deceptively easy Pulled Chicken Sandwich recipe, which includes a few-ingredient rub and a simple 15-minute sauce that comes together while the chicken oven baked. 

    Did I mention these sandwiches are braised in a special sweet and tangy sauce? Yep! It gives the chicken a deep, rich flavor that intensifies with age, so you can make the chicken a day ahead and your sandwiches will taste even better! Perfection!

    pulled Chicken Sandwiches recipe
    Photo: Pulled Chicken Sandwiches

    You can serve this chicken in many ways, but I made them in sandwich form because, honestly, what man can resist a toasty bun piled high with tender, juicy pulled chicken, oodles of caramelized onions, tangy barbecue sauce and melty cheese? I can’t think of one! You can serve this on a sandwich as I did, or you can serve on tacos, nachos and burritos, Ole! I’m already thinking of the delicious ways I plan to use this in the future.

    Photo: Pulled Chicken Sandwiches
    Photo: Pulled Chicken Sandwiches


    Bismillah, Let’s get started!

    Check it out the Pulled Chicken Sandwiches recipe and printable version below.

    Pin it For Later

    Pin it for later

    Put your own spin on it. And lemme know how it turns out. Post a photo on Facebook (Recipestable) or  on Twitter so I can see how lovely yours turn out.


    Happy Cooking!!

    If you like this post, Please Subscribe to my blog and let me know your feedback by commenting below.. I have lots more recipes to share with you.

  • Sweet and Sour Chicken with Noodles

    Sweet and Sour Chicken with Noodles

    This Sweet and Sour Chicken recipe is super easy to make. All you will need is one wok or a skillet, and all of the ingredients listed below. It takes about 30 minutes to make this mouthwatering dish. Delicious dinner made in no time!

    Sweet and Sour Chicken with Noodles

    This Sweet and Sour Chicken recipe is super easy to make. All you will need is one wok or a skillet, and all of the ingredients listed below. It takes about 30 minutes to make this mouthwatering dish. Delicious dinner made in no time!
    Prep Time 5 minutes
    Cook Time 25 minutes
    Total Time 30 minutes
    Servings 6
    Author Bushra Waheed

    Ingredients

    • 6 boneless chicken breast halves cut into 1-inch pieces
    • 2 tbsp cornstarch
    • 2 tbsp vegetable oil
    • 1 egg white
    • 1 tsp white pepper
    • 2 tbsp ginger & garlic grated
    • 1 can pineapple chunks drained
    • 1 red bell pepper cut into 1- inch cubes
    • 1 green bell pepper cut into 1- inch cubes
    • 1 onion cut into cubes
    • salt to taste

    For Sweet and Sour Sauce

    • 2 tbsp soy sauce
    • 2 tbsp pure honey
    • 1/2 cup white vinegar
    • 1/2 cup tomato ketchup
    • 1/2 cup pineapple juice
    • 1/4 tsp salt
    • boiled noodles to serve

    Instructions

    Method

    • In a bowl, combine the soy sauce, honey , vinegar, tomato ketchup, pineapple juice and salt.
    • Whisk well and set aside.

    To make Sweet and Sour Chicken

    • Rinse Chicken and pat dry.
    • In a medium bowl, add chicken ,cornstarch, egg white, salt and pepper. Mix well.
    • Stir to coat the chicken evenly. Marinate for 30 minutes at room temperature.
    • Heat a large nonstick pan over high heat until blazing hot.
    • Add 1 tbsp of oil and swirl to coat.
    • Add the coated chicken to the pan and spread the chicken in form of one layer.
    • Let the chicken fry, don’t touch for 1 -2 minutes or until the bottoms are browned.
    • Turn and fry the other side of chicken for more 1-2 minutes.
    • Once the chicken is cooked, remove from the pan and set aside.
    • Heat the remaining 1 tbsp oil in the pan over medium heat.
    • When the oil heat up, then add grated ginger & garlic, red bell pepper, green bell pepper.
    • Stir fry for 1-2 minutes then add pineapple chunks and sweet and sour sauce.
    • Turn the heat to high.
    • Bring to boil then add the chicken and simmer on low heat for 2-3 minutes or until the chicken is cooked thoroughly. Sweet and Sour Chicken is ready to serve!

    Notes

    Serve over boiled noodles.
  • Sweet and Sour Chicken with Noodles Recipe (30 Minute Meal)

    Sweet and Sour Chicken with Noodles Recipe (30 Minute Meal)

    Sweet and Sour Chicken with Noodles

    An easy and delicious weeknight meal loaded with healthy ingredients. A one-pan, 30 minute chicken stir fry recipe.This quick and easy sweet and sour chicken with noodles will be ready to eat in less than 30 minutes.

    sweet-sour-chicken-with-noodles

    Sweet and sour Chicken is one of the most popular Chinese dishes and My family is a big fan of sweet and sour chicken so I thought I would try this recipe with noodles. It was a huge hit in our house and even they ate tons of it! Definitely a keeper for a easy go to dinner meal.

    sweet-sour-chicken-with-noodles1

    This Sweet and Sour Chicken recipe is super easy to make. All you will need is one wok or a skillet, and all of the ingredients listed below. It takes about 30 minutes to make this mouthwatering dish. Delicious dinner made in no time!

    Tender, juicy pieces of chicken in a tangy sweet and sour sauce with pineapple chunks, onion and peppers, served on a Bed of Noodles.

    Bismillah, Let’s get started!

    Check it out the Sweet and Sour Chicken with Noodles recipe and printable version below.

     If you make this recipe, I’d love to see pics of your creations on Instagram, Facebook and Twitter! Hashtag them #recipestable.


    Put your own spin on it. And lemme know how it turns out. Post a photo on Facebook (Recipestable) or  on Twitter so I can see how lovely yours turn out.


    Happy Cooking!!

    If you like this post, Please Subscribe to my blog and let me know your feedback by commenting below.. I have lots more recipes to share with you.

  • Pakistan Independence Cake Recipe

    Pakistan Independence Cake Recipe

    As the whole Pakistan is celebrating Independence Day today, desserts and sweets are must in your cooking list. But what if you are planning to make a Pakistan Independence Day Cake with green topping and White layers to celebrate the national event.

    Pakistan Independence Cake Recipe

    As the whole Pakistan is celebrating Independence Day today, desserts and sweets are must in your cooking list. But what if you are planning to make a Pakistan Independence Day Cake with green topping and White layers to celebrate the national event.
    Prep Time 40 minutes
    Cook Time 25 minutes
    Total Time 1 hour 5 minutes
    Servings 8
    Author Bushra Waheed

    Ingredients

    • 1 cup plain flour
    • 1 teaspoon baking powder
    • pinch of salt
    • 4 eggs
    • 1 cup castor sugar
    • 1/2 cup butter
    • 2 tablespoon milk
    • 1 teaspoon vanilla essence

    For Filling

    • 2 cups Whipped cream (400 ml)
    • 2 tablespoon Icing sugar
    • 1 cup Pineapple chunks
    • Pineapple juice as required.
    • few drops of vanilla essence

    For topping

    • one packet banana jelly
    • whipped cream as required

    Instructions

    To Make Cake Sponge

    • Prepare your cake pan by lining it with grease proof paper and greasing it to make sure the cake doesn’t stick. I used an 8 inch pan. You can use a slightly smaller one if you want a higher cake.
    • Preheat oven at 170 degree C.
    • In a small bowl, sieve the flour, baking powder and salt, twice or thrice time to aerate it. keep aside.
    • Put the eggs in a big glass bowl, then add the sugar.
    • Beat the eggs for 2-3 minutes.
    • Then add butter and whisk till light and fluffy, about 5 minutes.
    • The eggs will have started expanding from the beating. Keep beating for about 4 minutes until the egg mixture resembles cream. The beaters should leave streaks in the mixture as you whip, like how whipping cream looks at the ‘soft peak’ stage.
    • Once you have reached this consistency, remove the beaters and use a whisk.
    • Whisk the egg mixture for a few seconds.
    • Using a spatula, GENTLY fold the flour in using 30 strokes or less.
    • Don’t over mix.
    • When the flour is mixed, add warm milk.
    • Stir in the vanilla essence.
    • Now fold again no more than 50 times or less until the batter is well combined and shiny.
    • Pour into the prepared pan.
    • Pick and drop the pan twice to remove any excess air bubbles.
    • Then bake, in the preheated oven, for 23-25 minutes or until toothpick insterted near the center comes out clean.
    • Again pick and drop the pan twice to prevent it from shrinking as it cools.
    • Now turn the pan over on a cake rack but do not remove the pan.
    • Let the pan cool down until it is easy to handle with your hands without getting burnt.

    To Make Cake Filling

    • Meanwhile, whip your cream with 2 icing sugar.
    • Stir in the vanilla essence.
    • Adjust sweetness to your taste and keep aside.

    To Assembling the Cake

    • Remove the pan from the cake and peel the greaseproof paper. cut the cake horizontally into half.
    • Drizzle pineapple juice syrup all over the cut halves to moisten the cake.
    • Then spread the whipped cream evenly.
    • Add pineapple chunks.
    • Cover them with more cream, put the second half of the cake and cream the top.
    • Place in the refrigerator for 2 hours or until the cream sets.
    • Meanwhile, make jelly in the warm water and slightly pour over the cake (1/3 side).
    • Make a moon and star shape with leftover whipped cream.
    • Put in the refrigerator for few hours or until chilled.
    • Enjoy your delicious Independence day cake 🙂

    Notes

    Important Tips:
    If you over mix the flour mixture or fold too vigorously, you will lose all the air that has built up in the eggs, so be gentle in folding.
  • Pakistan Independence Day Cake Recipe

    Pakistan Independence Day Cake Recipe

    Happy Independence Day, Pakistan!

    Pakistan Independence Day Cake

    As the whole Pakistan is celebrating Independence Day today, desserts and sweets are must in your cooking list. But what if you are planning to make a Pakistan Independence Day Cake with green topping and White layers to celebrate the national event.

    Pakistan Independence Day Cake
    Pakistan Independence Day Cake

    Here’s a recipe for Pakistan Independence Day Cake!

    LONG LIVE PAKISTAN

  • Creamed Peas Recipe

    Creamed Peas Recipe

    Vibrant green peas simmer in a simple sauce of milk, flour, and butter in this quick side dish.

    Creamed Peas Recipe

    Vibrant green peas simmer in a simple sauce of milk, flour, and butter in this quick side dish.
    Prep Time 5 minutes
    Cook Time 15 minutes
    Total Time 20 minutes
    Servings 4
    Author Bushra Waheed

    Ingredients

    • 1-1/2 cup green peas boiled
    • 2 tablespoon butter
    • 1 tablespoon all-purpose flour
    • 2 tablespoon heavy cream
    • 1/4 cup milk
    • 1/2 teaspoon white sugar
    • a pinch of pepper
    • salt to taste

    Instructions

    Method

    • Melt butter in a saucepan over low heat and whisk in flour until well blended and smooth.
    • Now very gradually stir in the milk. When milk is combined, add sugar, salt and pepper.
    • Cook and stir for few minutes or until sauce begins to boil.
    • keep stirring for 1-2 minutes then add green peas and stir. Cover pan and allow to simmer for 2 minutes over medium heat or until sauce is thickened.
    • Reduce heat to medium low then stir in heavy cream.
    • Cook over medium-high heat until for 1 minutes or until thick and bubbly.
    • Remove from the heat and dish it out. Delicious Creamed Peas are ready to enjoy 🙂

    Notes

    Serving Suggestions:
    Serve with grilled Kabobs.
  • The Best Creamed Peas Recipe

    The Best Creamed Peas Recipe

    Creamed Peas 

    Everything’s better with cream…especially vegetables.Vibrant green peas simmer in a simple sauce of milk, flour, and butter in this quick side dish. 

    The Best Creamed Peas
    The Best Creamed Peas

    In my search for a good creamed peas recipe, I found many, but none that quite matched what I wanted. So I took to my own creativity and came up with this absolutely fabulous and The Best Creamed Pea recipe. My family love it so much and we have this on the side quite often. And I double this every time, and not a single pea is left! Alhumdulillah 🙂

    The Best Creamed Peas
    The Best Creamed Peas

    Do try this recipe, these Creamed Peas can become your ultimate side dish.

    Bismillah, Let’s get started!

    Check it out the Creamed Peas recipe and printable version below.

    Recipe Note’s:

    Don’t over cook the peas. Soggy peas will ruin this dish. You want them tender but firm.


    Put your own spin on it. And lemme know how it turns out. Post a photo on Facebook (Recipestable) or  on Twitter so I can see how lovely yours turn out.


    Happy Cooking!!

    If you like this post, Please Subscribe to my blog and let me know your feedback by commenting below.. I have lots more recipes to share with you.

  • Karela Gosht (Meat with Bitter Gourd) Recipe

    Karela Gosht (Meat with Bitter Gourd) Recipe

    Bitter gourd, aka Karela In Urdu, is relished for its benefits and despised for its bitter taste – not many people like this veggie, but I die for it.

    Karela Gosht (Meat with Bitter Gourd) Recipe

    Bitter gourd, aka Karela In Urdu, is relished for its benefits and despised for its bitter taste – not many people like this veggie, but I die for it.
    Prep Time 30 minutes
    Cook Time 1 hour 20 minutes
    Total Time 1 hour 50 minutes
    Servings 6
    Author Bushra Waheed

    Ingredients

    • 1 kg bitter gourd/ karela peeled, cleaned and sliced
    • 1 teaspoon salt for sprinkling
    • 750 gm mutton or lamb meat
    • 1/2 cup cooking oil
    • 4 medium onion thinly sliced, (divided into two parts)
    • 3 medium tomatoes thinly sliced
    • 1 inch piece of ginger thinly sliced
    • 1 garlic bulb peeled & minced
    • 4 green chilies
    • 2 teaspoon red chili powder
    • 1 teaspoon cumin powder
    • 1 teaspoon coriander powder
    • 1/2 teaspoon turmeric powder
    • 1 teaspoon garam masala powder all spice powder
    • salt to taste
    • 4 cups water for meat tenderness

    Instructions

    Method

    • Peel bitter gourds and remove seeds.
    • Apply some salt on sliced bitter gourds and keep aside for 30 minutes.
    • Now rinse thoroughly and squeeze in hands to remove its bitterness.
    • Heat 4 tablespoon oil in a frying pan and fry them until they are golden brown.
    • Take them out on a clean kitchen paper tower.
    • Heat half cup oil in a heavy bottom skillet or pot over medium heat.
    • Saute onion, ginger and garlic for few minutes or until transculant.
    • Add meat, tomato, salt, red chili, turmeric powder, cumin powder and coriander powder.
    • Cook and stir 5-10 minutes until meat change its color.
    • Add water and cook for 1 hour or until meat is tender.
    • Now cook on high heat until the water dries.
    • Fry the meat for 5 minutes.
    • Now add leftover thinly sliced onions and fried bitter gourd and stir well.
    • Add green chillies and let it cook covered on medium-low heat for about 5 to 7 minutes or until oil comes on top and onion become caramelized.
    • Take it in a serving dish. Karela Gosht is ready to serve.

    Notes

    Serving Suggestions:
    Serve hot with homemade chapatis and onion-zeera raita.
  • How to: Make Karela Gosht (Meat Curry with Bitter Gourd)

    How to: Make Karela Gosht (Meat Curry with Bitter Gourd)

    Bitter Gourd (Karela)

    Bitter gourd, aka Karela In Urdu, is relished for its benefits and despised for its bitter taste – not many people like this veggie, but I die for it.

    Benefits of Bitter Gourd (Karela)

    Here are some Benefits of Mr. Bitter Gourd (Aka karela)

    Bitter gourds have many nutritional and health benefits and one of them is they are good for diabetes. It is an excellent source of vitamins B1, B2, and B3, C, magnesium, folate, zinc, phosphorus, manganese, and has high dietary fiber. It is rich in iron, contains twice the beta-carotene of broccoli, twice the calcium of spinach, and twice the potassium of a banana.

    As my Chronic illness  forces me to transform eating habits, I’ m always on the hunt for natural antioxidants ingredients and Bitter Gourd (Karela) is one of them. I try to eat bitter gourd at least twice in a month because of its antioxidant benefits. It is very good for you, specially if you are diabetic. This reduces your blood sugar level a lot than you can imagine..So try to include it in your everyday diet.

    Bitter Gourd aka 'Karela'
    Bitter Gourd aka ‘Karela’

    The people who have never had bitter gourd, I still know what you all must be thinking.

    Doesn’t it taste bitter??

    How can one eat it??

    Actually it is very much edible and likable.  Truth is that there are numerous ways in which Bitter gourd is prepared in Pakistan. It can be stuffed with tasty spice mix, it tastes delicious when deep fried with mince stuffing( Bharwan Karela ), it can be used to make a dry curry and my mommy makes amazing curry of bitter gourd (Karela Gosht) which doesn’t taste bitter at all. It just depends how it is prepared. So at times it depends on which ingredients and technique you use and also on individual preferences.

    Karela Gosht (Meat with Bitter Gourd)

    Karela Gosht (Bitter gourd cooked with meat) is a traditional Pakistani dish. Yet, there are many Pakistani’s who flee from the very name of Karela. 😛 

    Today, I am presenting one of the tried recipes that gained appreciation among random people. Signature style of using minimum ingredients to make a mouth-watering dish is again used. I am using mutton meat in this recipe, but if you like you can use beef or chicken too. 

    How to make Karela Gosht
    Photo: ‘Karela Gosht'{Bitter Gourd Cooked with Meat and Saute Onion}

    In my home, everyone loves bitter gourd and its diverse dishes. It tastes savory, tangy, wonderfully spicy and slightly bitter at the same time. Karela Gosht is my all time favourite. As I mention above,  I make them quite often and each time they turn out great.(Alhumdulillah)!

    How to make Karela Gosht
    Photo: Karela Gosht with Chapati

    It tastes great with roti / hot chapati or with tandoori roti along with zeera raita. 

    How to make Karela Gosht
    Photo: Karela Gosht

    How to make Karela Gosht

    Learn how to make easy and simple Karela Gosht by following the step by step instructions as shown in  pictures. The recipe is simple and very easy to follow. You would successfully cook it in first attempt. (InshaAllah)

    Bismillah Let’s Begin!

    Ingredients you will need:

    • 1 kg bitter gourd/ karela (peeled, cleaned and sliced)
    • 1 teaspoon salt, for sprinkling
    • 750 gm mutton or lamb meat
    • 1/2 cup cooking oil
    • 4 medium onion, thinly sliced, (divided into two parts)
    • 3 medium tomatoes, thinly sliced
    • 1 inch piece of ginger, thinly sliced
    • 1 garlic bulb, peeled & minced
    • 4 green chilies
    • 2 teaspoon red chili powder
    • 1 teaspoon cumin powder
    • 1 teaspoon coriander powder
    • 1/2 teaspoon turmeric powder
    • 1 teaspoon garam masala powder (all spice powder)
    • salt to taste
    • 4 cups water for meat tenderness
    Step 1:

    First wash bitter gourds thoroughly in cold running water. Now Scrape the outer peel of the bitter melon with a sharp peeler or paring knife to remove a thin layer of peel.

    karela gosht step 1
    Peel or Scrape skin of bitter gourd (Karela)

    Step: 2

    Cut the bitter gourd in half length-wise. Slit from one side to remove seeds and fibrous core using a teaspoon or a paring knife.  

    karela gosht recipe step 2
    Cut the bitter gourd and remove the seeds.

    Step 3:

    Sprinkle 1 teaspoon salt over the peeled bitter gourds, toss together to mix evenly and keep it in sunlight for an hour, it will help to reduce its bitterness.

    karela gosht recipe step3
    Sprinkle Salt and keep it in sunlight

    Step 4: 

    After one hour, You would see salt and sunlight is doing its magic and bitter gourd has started perspirating. Now rinse thoroughly with tap water and keep aside for 10 minutes in a strainer to dry access water.

    karela gosht recipe step 4
    Rinse thoroughly with tap water

    Step 5: 

    Now take the bitter gourd and squeeze it in your hands, the juices will come out and try to remove as much bitter juice out of it as possible. Squeeze and  Squeeze…. don’t give up!!!

    karela gosht recipe step 5
    Squeeze and Squeeze…. don’t give up!!!

    Step 6:

    Cut the bitter gourd into cubes, thin slices, rings or lengthwise. (any desired shape or sizes).

    karela gosht recipe step 6
    Cut into your desired shape

    Step 7: 

    Heat some oil and fry the bitter gourd (in batches) on medium heat for few minutes or until golden brown. Remove from the oil, drain and set aside.

    karela gosht recipe step 7
    Fry Bitter Gourd

    Step 8: 

    Heat 1/2 cup oil in a large pot over medium heat. Saute onion until transculant. Add garlic and ginger and cook for 30 seconds or  the garlic aroma to hit its peak.

    karela gosht recipe step 8
    Saute Onions and Ginger & Garlic

    Step 9: 

    When onion starts getting golden add meat and cook on high flame until meat change its color and turned brown, continuously stir.

    karela gosht recipe step 9
    Brown the meat

    Step 10:

    Now add chopped tomatoes and spices (turmeric, red chili, coriander, etc).  Stir and cook on low flame until tomatoes soften.

    karela gosht recipe step 10
    Add Tomatoes and Seasoning

    Step 11: 

    Add 4 cups of water. Heat to boiling, covered with a lid and simmer for 1 hour on low flame or until meat become tender and juicy. 

    karela gosht recipe step 11
    Cook Covered on low flame

    Step 12: 

    When meat gets cooked properly at this stage increase the flame and cook on high flame for 5 to 7 minutes or until oil comes on top and meat is tender fully. Now add leftover 2 onions and fried bitter gourd. Stir and cook on medium flame for 10-15 minutes or until onion turned caramelized and oil  separates.

    karela gosht step12
    Add fried bitter gourd and onions

    Step 13 

    Sprinkle garam masala and add green chillies and adjust seasoning to taste.. Its ready to serve. Take it out in a serving dish. Serve hot with Homemade Chapati or Roti.

    karela gosht step13
    Serve with garm garm (hot) chapati… ENJOY!

    Tip to First timers: Tasting is important before the final dish is served so that you can adjust the flavour. ENJOY 🙂 

    Check it out the Karela Gosht (Meat with Bitter Gourd) recipe and printable version below.

    Do try the recipe, and let me know how you find bitter gourd. Also there are many varieties and I will keep posting new recipes of bitter gourd in future. Till then see ya all!!!


    Put your own spin on it. And lemme know how it turns out. Post a photo on Facebook (Recipestable) or  on Twitter so I can see how lovely yours turn out.


    Happy Cooking!!

    If you like this post, Please Subscribe to my blog and let me know your feedback by commenting below.. I have lots more recipes to share with you.

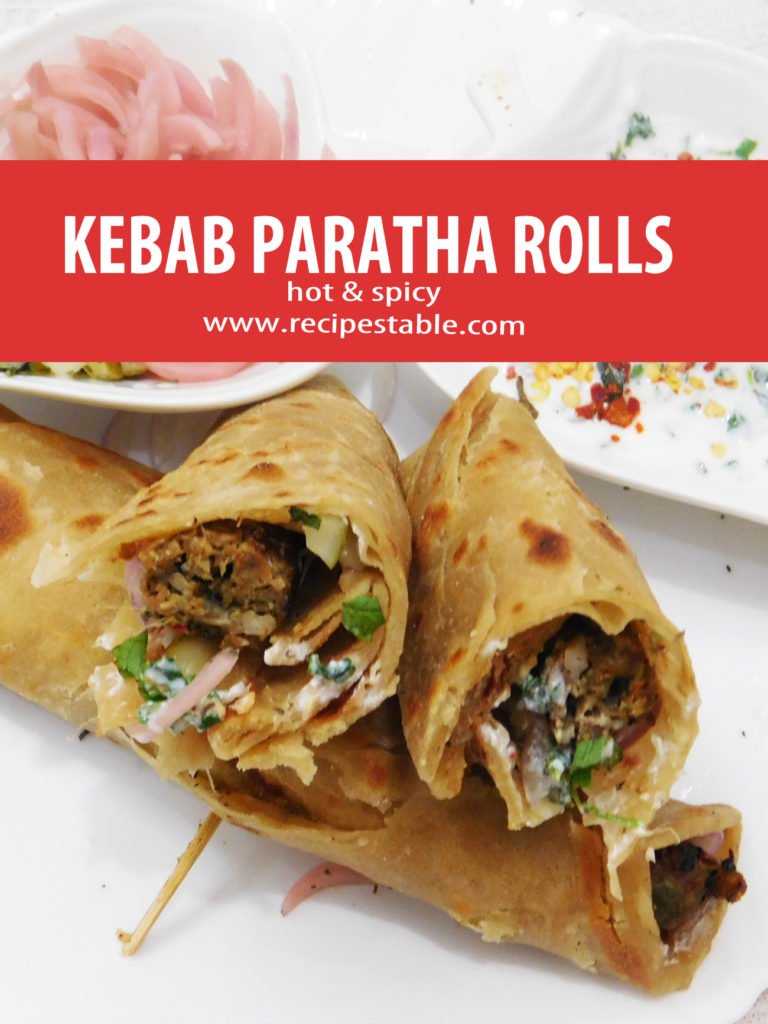
  • Hot and Spicy Kebab Paratha Rolls Recipe

    Hot and Spicy Kebab Paratha Rolls Recipe

    What better way to spice up the weekend lunch than with a Kebab Paratha Rolls stuffed with flavorful hot and spicy sauces and colorful veggies.

    Hot and Spicy Kebab Paratha Rolls Recipe

    What better way to spice up the weekend lunch than with a Kebab Paratha Rolls stuffed with flavorful hot and spicy sauces and colorful veggies.
    Keyword 30 minutes meals, kebab, kids friendly, paratha, paratha rolls, Quick and Easy, rolls, wraps
    Prep Time 10 minutes
    Cook Time 20 minutes
    Total Time 30 minutes
    Servings 4
    Author Bushra Waheed

    Ingredients

    For Kebabs

    • 300 gm mince meat
    • 1 large onion minced
    • 1 inch piece of ginger crushed
    • 4 green chilies chopped
    • 1/4 bunch fresh coriander
    • 1 teaspoon red chili powder
    • 1 teaspoon cumin powder
    • 1/2 teaspoon coriander powder
    • 1/2 teaspoon all spices powder garam masala
    • salt to taste
    • 2 tablespoon oil or butter for busting

    For Parathas

    • 1 cup whole wheat flour
    • 1 cup white flour
    • Salt to taste
    • 2 tablespoon clarified butter desi ghee
    • Water as required
    • black seeds as required optional

    For Paratha Roll Topping & Stuffing

    • 4 tablespoon mayo garlic sauce
    • 4 tablespoon mint yogurt chutney
    • 1 cup pickle cucumber, onion, carrot, green chili etc
    • few salad leaves
    • chili flakes (optional)

    Instructions

    Method

    • Put mince, onion, green chilies, ginger, coriander, red chili, cumin seeds, salt and all spices in a chopper. Process until well combined.
    • Now make shape of long seekh kebabs and set aside.
    • Heat 2 tablespoon oil or butter in a pan over medium heat.
    • Shallow fry the kebabs covered on low heat for 10-15 minutes or until all the water of mince dries and kebabs are done.

    To Make Parathas

    • Place flours in a large bowl. Add ghee and salt in it. Knead a soft dough with water.
    • Let it rest for 1 hour at room temperature.
    • Preheat the iron griddle or pan over low heat.
    • Now make round shape parathas with the help of rolling pin.
    • Sprinkle black seeds over it and press gently.
    • Cook parathas with butter on medium heat until crispy.
    • Take it out in a plate and set aside.

    To Assemble kebab Paratha Roll

    • Now place paratha’s on a clean surface.
    • Spread mayo garlic sauce over the paratha’s.
    • Put salad leaves and 2 seekh kebabs over the each paratha.
    • Pour minty yogurt chutney over it.
    • Sprinkle pickles and chili flakes (if like it). Roll up tightly and secure with wooden pick.
    • Now Cut the paratha roll from the center. Hot and Spicy Kebab Paratha Roll is ready to serve. ENJOY!!

    Notes

    Serving Suggestions:
    Serve hot with sauce and salad of your choice along with Lemonade.
  • Hot and Spicy Kebab Paratha Rolls Recipe

    Hot and Spicy Kebab Paratha Rolls Recipe

    Every day the same question pops up “What to make for Lunch today?” and when the same question is asked on a weekend the response has to be something that’s not the usual and really delicious. 

    What better way to spice up the weekend lunch than with a Kebab Paratha Rolls stuffed with flavorful hot and spicy sauces and bright colorful vegetables pickles.

    Hot and Spicy Kebab Paratha Rolls recipe
    Hot and Spicy Kebab Paratha Rolls recipe

    It’s the age of one pot meal and who says one pot meal has to be a rice dish. It can be bread based dish as well. I believe wraps or rolls loaded with meat, kebabs and veggies also come in the genre of one pot meal and why not, bread gives us starch while veggies help bring a balance diet while meat gives us protein.

    The best thing about it is, that its a wholesome meal and can be prepared with leftover kebab’s too. Its as simple as assembling it all together (if that makes sense). 

    Hot and Spicy Kebab Paratha Rolls recipe
    Hot and Spicy Kebab Paratha Rolls

    Ingredients in Hot and Spicy Kebab Paratha Rolls

    The ingredients you need to make this Hot and Spicy Kebab Paratha Rolls are:

    For Kebabs: meat, onion, ginger, green chilies, fresh coriander, red chili powder, cumin powder, coriander powder, all spices powder, salt, butter for busting
    For Parathas:  whole wheat flour, white flour, Salt, clarified butter, water for kneading and black seeds (optional)
    For Topping & Stuffing: mayo garlic sauce, mint chutney, pickle cucumber, onion, carrot, green chili, few salad leaves, red chili flakes (optional)

    Hot and Spicy Kebab Paratha Rolls recipe
    Hot and Spicy Kebab Paratha Rolls recipe

    How to make Hot and Spicy Kebab Paratha Rollso:

    Hot and Spicy Kebab Paratha Rolls are straight forward to make. Prepared kebabs then make paratha’s and stuff with kebabs, sauce and topping.
    Pretty simple!!

    For this recipe, I’ve prepared the homemade Paratha’s but you can use store bought frozen paratha in case you don’t feel like making your own and keeping it all quick and simple.

    Hot and Spicy Kebab Paratha Rolls recipe
    Hot and Spicy Kebab Paratha Rolls recipe

    You can pack them and stuff your lunch box too making it a totally mess free meal for yourself. As with all wraps, you can use filling of your choice. For me it had to be this kebab paratha rolls, with some garlic sauce, minty yogurt chutney and  colorful pickle that were wrapped in the paratha rolls and gave those hot, zingy and spicy flavors that were sure to tickle those taste buds! 

    Do try this recipe, these Hot and Spicy Kebab Paratha Rolls can become your ultimate comfort and nutritious food.

    Bismillah, Let’s get started!

    Check it out the Hot and Spicy Kebab Paratha Rolls recipe and printable version below.

    Pin it For Later:

    Pin it for Later ~ Hot and Spicy Kebab Paratha Rolls

    I have also posted Shami Kabab Paratha Rolls and Chicken Paratha Rolls which are another easiest & tastiest version of making Paratha Rolls at home. Do check it out as well.  It’s finger lickin’ good. You’ll be coming back for more. 


    Put your own spin on it. And lemme know how it turns out. Post a photo on Facebook (Recipestable) or  on Twitter so I can see how lovely yours turn out.

    Happy Lunch Making!!

    If you like this post, Please Subscribe to my blog and let me know your feedback by commenting below.. I have lots more recipes to share with you.

  • Food Blogger Interview: Meet Fatimah from Muslim Girl Bakes

    Food Blogger Interview: Meet Fatimah from Muslim Girl Bakes

    Welcome to another edition of Interview with a food blogger!

    Meet Fatimah from Muslim Girl Bakes

    Today, we’re chatting with Fatimah, the Muslim blogger behind the fabulous food photography and recipes blog ThisMuslimGirlBake. Fatimah loves trying out new recipes. On her blog, she shares her favorites, along with stunning pictures. I absolutely love the way she styles food (even her recipe instructions are gorgeous!).Most of her recipes are quick too and perfect for busy weeknights. ThisMuslimGirlBake is a great place to find meal ideas you and your family will love! Scroll down to read the interview and go give Fatimah some love!

    83000d
    Food Blogger Interview: Meet Fatimah from Muslim Girl Bakes

    Interview with Fatimah from Muslim Girl Bakes

    Bushrah: Aslam-o-Alakaum Wr Wb. Jazakillah khaira for joining us today now first we would love to know about you. _ tell us a bit you and Your Blog _ A girl behind “This Muslim?

    Fatimah: Thank you so much for having me! I blog at This Muslim Girl Bakes. I usually post full photo step-by-step sweet and savoury recipes twice a week. My sweet recipes are usually my latest dessert/baked good success and my savoury recipes are from all over the world. I love putting a halal spin on different recipes but am well known for my Pakistani recipes being of Pakistani origin myself.

    Bushrah: What is the story behind your blog’s name, This Muslim Girl Bake?

    Fatimah: I wish I had some amazing story behind the name but honestly it just came to me one day! And has stuck ever since!

    Bushrah: Describe your Blog in Three words??

    Fatimah: So many photos!

    Bushrah: What are your cooking inspirations? A famous chef, your mom, a Cookbook, a Blog?

    Fatimah: As for cooking inspiration, I would have to say my family. I come from a family of very strong, female home cooks. My mother is an amazing cook as was her mother before her. They all cooked and still cook simple recipes to feed busy homes. I’m also inspired by the Internet as a whole. I love how anyone from anywhere can share a recipe online. You can cook a recipe which is from a New York kitchen one day and the next, a traditional dish from Hong Kong. It’s amazing!

    Bushrah: Who or what inspired you to take the plunge and start your own food blog?

    Fatimah: I had been reading food blogs for a  few years before starting my own. Being surrounded by a group of friends from different places and cultures, the food of our homes was always a topic of conversation. How we cooked different curries or what we had eaten on Eid. When describing my own recipes, I would think, wouldn’t it be easier if I could just take pictures and show them? And so that’s what I did. I also wanted a place for all my family recipes. I felt that so many of our traditional Pakistani recipes were falling out of fashion or weren’t even represented on the food blog scene. The blog was and still is my chance to preserve those age-old recipes.

    Bushrah: Did you ever think that you would be so successful at blogging when you started?

    Fatimah: No way! At the beginning, it was only my mum who was reading the blog. Then, it filtered out to family, friends and the wider world. I remember when I got my first 100 views and then the 1000! I was so excited!

    Bushrah:  What’s your biggest failure ever in the Kitchen?

    Fatimah: I have so many!! Recently, there are two that come to mind. The first, those fiddly French macrons and the second, choux pastry.

    Bushrah:  What is your favorite dish?

    Fatimah: That is such a hard question! It honestly depends on my mood and what I’m craving. But I think one dish I could never say no to is a freshly- made chicken pulao. It will always be one of ultimate comfort foods – a real taste of home.

    Bushrah: Any Ingredients you can’t stand? Which one can’t you live without?

    Fatimah: I cannot stand desiccated coconut. This is something my mother does not understand as she has always loved it. On the other hand, I couldn’t live without my spice cupboard! Especially things like cumin, cinnamon, coriander and chilli. I not only use them in Pakistani recipes but add them to other things for a little twist! Can I also add butter to that list? I use it for baking and sometimes, cooking. A little butter always makes things better!

    Bushrah: What’s the most adventurous dish you’ve ever eaten?

    Fatimah: The most adventurous dish I’ve ever eaten would have to be the Pai curry. It’s made with cows trotters and gives off the strongest smell when cooking!

    Bushrah: What kind of recipes most of the people want these days?

    Fatimah: I’ve found that people want quick recipes with the least number of ingredients. Also, I’ve seen an increased interest in old, traditional dishes. As we get older, we become more nostalgic and want to cook the things our mothers made when we were children.

    Bushrah: What ingredients would you like to use to make a scrumptious dessert? You can only pick four!

    Fatimah: My current favourite 4-ingredient dessert would have to be the lemon posset. It’s a really old English chilled dessert made with lemons, caster sugar and double cream. That’s three things and so I would serve it with number four – buttery shortbread fingers to dip!

    muslimgirlbake-dessert

    Bushrah: How have you found the public’s reaction to your recipes and writing?

    Fatimah: I’ve been really lucky in my 4 years of blogging to have had a really positive reaction. Now and again, you will get one or two people who were not fans of a certain recipe. But that’s to be expected – everyone has different tastes and so it is impossible to please everyone!

    Bushrah: What’s your favorite recipe from your blog?

    Fatimah: Again, that is such a hard question! Every recipe I post is my current favorite! An all-time favorite that I turn to time and time again would be our house Pakistani chicken curry. It’s a timeless classic and I love it.

    muslimgirlbake-chicken

    Bushrah: What piece of Photography equipment could you not go without?

    Fatimah: Sounds obvious but most definitely, my camera. It’s simple to use and small enough to have with me in the kitchen. I post step-by-step photo recipes so having a smaller camera is the best thing for me.

    Bushrah: If I’m only going to make one dish from your blog, which one should it be?

    Fatimah: Again, such a hard question! And again, it depends on my mood. Right now, I’m obsessed with my sea salt chocolate chunk cookies. I made a batch on snapchat recently just so I could stash the cookie dough into the freezer for emergencies! They are that good!

    Bushrah: What’s one secret talent outside of the kitchen nobody knows about you?

    Fatimah: Food styling and food photography! I wouldn’t really call it a talent because I’m still such a novice myself. But I’ve been loving putting more thought and care into my food photos to make them look the best.

    muslimgirlbake-pizza

    Bushrah: Have there been any mistakes along the way that you have learnt from ?

    Fatimah: So many mistakes! I make mistakes everyday and as long as I learn from them, I don’t mind. For example, a few days ago I made porridge. I added the water to the oats all at once which resulted in lots of lumps in the end result. Next time, I will add the water gradually. So, as long as I learn from my mistakes, I don’t mind.

    Bushrah: What are your top tips for newie food bloggers?

    Fatimah: Write the food blog that you yourself would want to read. Cook the things on your blog that you cook in real life. Bake the things on your blog that you bake in real life. And most importantly, love the content that you’re posting. The love and passion that you have for your content will filter through to your readers. And, most importantly of all, enjoy it!

    Head over to Fatimah’s recipe index or see her Pinterest board dedicated to Muslim Girl Bakes recipes for more recipes!

    Follow Fatimah on Social Media: Pinterest, Facebook, Instagram and Twitter