Author: Bushra Waheed

  • The Perfect Party Appetizer: Easy Potato Chicken Balls Recipe

    Potato Chicken Balls

    This  Potato Chicken Balls recipe gives a unique twist to the general way the potatoes are cooked. A great way to use leftovers. My family love these for lunch with a simple tossed salad.

    Potato Chicken Balls Recipe
    Photo: Potato Chicken Balls Recipe

    Check it out the Potato Chicken Balls Recipe here!!

    [divider]

    [one_fourth]Prep Time:20 minutes[/one_fourth] [one_fourth]Cook Time:10 minutes[/one_fourth] [one_fourth]Servings:8 [/one_fourth] [one_fourth_last]Difficulty Level: Very Easy[/one_fourth_last]

    [divider]

    [tabs type=”horizontal”] [tabs_head] [tab_title]Ingredients[/tab_title] [tab_title]Nutrition[/tab_title] [/tabs_head] [tab]

    • 6 boiled potatoes, mashed
    • 1 cup cooked chicken, shredded
    • 1⁄2 cup cheddar cheese
    • 1 cup breadcrumbs
    • 2 eggs, lightly beaten
    • 1/2 teaspoon black pepper powder
    • salt to taste
    • oil for deep frying

    [/tab] [tab]Yield: 8 servings

    Amount Per Serving: (1 serving= 4 balls)

    • Calories: 500
    • Total Fat: 7.7 g (Saturated Fat: 3.4 g)
    • Cholesterol: 88.7 mg
    • Sodium: 215.3 mg
    • Carbohydrate: 98.2 g
    • Dietary Fiber: 12.2 g
    • Protein: 24.4 g

    [/tab] [/tabs]

    Directions:
    [tabs type=”horizontal”] [tabs_head] [tab_title]Step by Step Method[/tab_title] [tab_title]Serving Suggestions[/tab_title][/tabs_head] [tab]

    Step 1

    Place chicken, potato and cheese in a large bowl.

    Step 2

    Season with salt and pepper. Mix well and make small balls of this mixture.

    Step 3

    Dip in egg then coat it in bread crumbs.

    Step 4

    Heat the oil and fry them until golden brown.

    Step 5

    Remove from the oil and drain on kitchen paper. Potato chicken balls are ready to serve. ENJOY!!

    [/tab] [tab]

    • Serve hot with ketchup.

    [/tab] [/tabs]

    If you like Potato Chicken Balls Recipe and make it then let me know your feedback by commenting below.And if you know more innovative ways in which we can utilize this mouth watering Potato Chicken Balls, do share with us and we would be glad to give it a try.
  • Quick Fix for Rainy Day Cravings: Easy 15-Minute Spring Onion Pakora Recipe!

    Want to have something different yet simple? Try out our special, spring onion pakora recipe from a member of the Recipestable Community. This Spring Onion Pakora is perfectly suitable as a snack or for rainy season.

    [one_third] Prep Time: 10 minutes[/one_third] [one_third]Cook Time: 10 minutes[/one_third] [one_third_last] Servings: 6 [/one_third_last]

    • 2 cups gram flour
    • 4 stems spring oions, cut into 1 inch pieces
    • 2 green chilies, thinly sliced
    • 1/2 onion, thinly sliced
    • 1 tsp red chili powder
    • 1 tsp ajwain
    • 1 tsp salt
    • Oil for deep frying

    [/tab] [tab]Yield: 6 servings

    Nutritional information is not yet available. [/tab] [/tabs]

    Directions:
    [tabs type=”horizontal”] [tabs_head] [tab_title]Step by Step Method[/tab_title] [tab_title]Serving Suggestions[/tab_title][/tabs_head] [tab]

    Step 1

    In a small bowl, combine together the gram flour, ajwain powder, red chili and salt.

    Step 2

    Add spring onion, green chilies and onions. Mix well.

    Step 3

    Add about 1 of water slowly and mix to form a smooth batter.

    Step 4

    Heat oil in a deep pan over medium heat.

    Step 5

    Take the batter coated onions 1- 2 at a time and slowly dip in the oil.

    Step 6

    Fry for 3-4 minutes or until golden brown.

    Step 7

    Remove from the oil and drain on a paper towel.

    Step 8

    Repeat in small batches. Spring Onion Pakora is ready to serve. ENJOY!!
    [/tab] [tab]

    • Serve instantly with green chutney or ketchup.

    [/tab] [/tabs]

  • Chili Meat Recipe

    This chili meat recipe will win over the pickiest judges in your crowd. Try this Chili Meat recipe from a member of the Recipestable Community.

    [one_third] Prep Time: 20 minutes[/one_third] [one_third]Cook Time: 4 hours[/one_third] [one_third_last] Servings: 6[/one_third_last]

    [review]

    [tabs type=”horizontal”] [tabs_head] [tab_title]Ingredients[/tab_title] [tab_title]Nutrition[/tab_title] [/tabs_head] [tab]

    • 1 kg Beef, thin fragments
    • 250 gm green chillies
    • 6 medium onions
    • 1 cup corn flour
    • 1/2 cup vinegar
    • 2 tablespoon soya sauce
    • corn oil As required
    • salt according to taste

    [/tab] [tab]Yield: 6 servings Nutritional information is not yet available. [/tab] [/tabs]

    Directions:
    [tabs type=”horizontal”] [tabs_head] [tab_title]Step by Step Method[/tab_title] [tab_title]Serving Suggestions[/tab_title][/tabs_head] [tab]

    Step 1

    Make meat’s very thin and very small fragments.

    Step 2

    Then add in these slices of meat, salt, common vinegar, or soya sauce and 8 cups of water and keep on slow flame.

    Step 3

    When see that meat is tender and water also remained two cups in the saucepan.

    Step 4

    Then takeout the fragments from saucepan and fry them a little in ghee or corn oil.

    Step 5

    Cut the onion very thick round shape pieces and if want to cut
    the Chilies in lengthwise then discard their seeds.

    Step 6

    Then fry a little this onion and Chilies.

    Step 7

    Now dissolve corn flour in remainder meat’s stock and along this also add meat, onion green Chilli, salt. Cook on slow flame.

    Step 8

    When broth / gravy become thick then remove or lift. Chili Meat is ready to serve. Enjoy!

    [/tab] [tab]

    • Serve with dinner rolls.

    [/tab] [/tabs]

  • Tuna Cheese Dip Recipe

    An easy to make, tasty tuna dip with cheese and mayo. Goes well with chips or crackers. Check it out the Tuna cheese dip recipe here!!

    [one_third] Prep Time: 10 minutes[/one_third] [one_third]Cook Time: 0 minutes[/one_third] [one_third_last] Servings: 6[/one_third_last]

    [review]

    [tabs type=”horizontal”] [tabs_head] [tab_title]Ingredients[/tab_title] [tab_title]Nutrition[/tab_title] [/tabs_head] [tab]

    • 2 (6 ounce) cans water-packed tuna, drained
    • 2 cups process cheese food, melted
    • 1 tbsp mayonnaise
    • 1 tsp butter, softened

    [/tab] [tab]Yield: 6 servings

    Amount Per Serving

    • Calories: 392
    • Total Fat: 28.4 g
    • Cholesterol: 96 mg

    [/tab] [/tabs]

    Directions:
    [tabs type=”horizontal”] [tabs_head] [tab_title]Step by Step Method[/tab_title] [tab_title]Serving Suggestions[/tab_title][/tabs_head] [tab]

    Step 1

    Place tuna in a medium bowl. Stir in mayonnaise and melted cheese.

    Step 2

    Drizzle with melted butter.

    Step 3

    Allow to cool completely.

    Step 4

    Refrigerate for 2 hours or until chill.

    Step 5

    Stir before serving. Tuna Cheese Dip is ready to serve. Enjoy!!

    [/tab] [tab]

    • Serve with Crackers.

    [/tab] [/tabs]

  • Thai Coconut Noodles Recipe

    These Thai Coconut Noodles are aromatic and flavorful, plus they’re quick and easy to prepare! With its seductive flavors of coconut, lime, ginger and cilantro, this Thai recipe is quickly becoming a favorite across the country. So Simple and Yummy!!
    Check it out Thai Coconut Noodles Recipe here!!

    [one_third] Prep Time: 10 minutes[/one_third] [one_third]Cook Time: 30 minutes[/one_third] [one_third_last] Servings: 4[/one_third_last]

    [review]

    [tabs type=”horizontal”] [tabs_head] [tab_title]Ingredients[/tab_title] [tab_title]Nutrition[/tab_title] [/tabs_head] [tab]

    • 1 (400 g) package rice noodles
    • 2 chicken breasts, cut into strips and cooked
    • 2 (10 ounce) cans coconut milk
    • 4 cups chicken stock
    • 1 medium onion, finely chopped
    • 3 garlic cloves, minced
    • 3 tbsp soy sauce
    • 2 tbsp vegetable oil
    • 1 tsp ground coriander
    • 1 tsp crushed red pepper flakes
    • 1 tsp cumin

    [/tab] [tab]Yield:4  servings

    Amount Per Serving

    • Calories: 801
    • Fat: 33 g
    • Cholesterol: 46 mg
    • Sodium: 1059 mg
    • Carbohydrate: 100 g
    • Dietary Fiber: 5.7 g
    • Sugars: 10.6 g
    • Protein: 24.6 g

    [/tab] [/tabs]

    Directions:
    [tabs type=”horizontal”] [tabs_head] [tab_title]Step by Step Method[/tab_title] [tab_title]Serving Suggestions[/tab_title][/tabs_head] [tab]

    Step 1

    Heat oil in a large pot or skillet over medium-high heat. Saute onion and garlic in hot oil for 2-3 minutes. Then stir in red pepper, coriander and cumin. Cook for 2-3 minutes or until onions are translucent.

    Step 2

    Stir in soy sauce, coconut milk and chicken stock. Simmer for 20 minutes. Stir in cooked chicken and rice noodles. Cook for 10 minutes longer or until the noodles are softened. Thai Coconut Noodles are ready to serve. Enjoy!!

    [/tab] [tab]

    • Serve warm.

    [/tab] [/tabs]

  • Apple Cabbage Slaw Recipe

    Apple Cabbage slaw is a healthy and low calorie coleslaw salad. It’s a light and refreshing side dish. In this flavorful coleslaw, apple adds fruity sweetness, crunch and color to the tangy cabbage. Goes well with Roasted Chicken. Try the easy recipe of Apple Cabbage Slaw shown below!!

    [one_third] Prep Time: 15 minutes[/one_third] [one_third]Cook Time: 0 minutes[/one_third] [one_third_last] Servings: 10[/one_third_last]

    [review]

    [tabs type=”horizontal”] [tabs_head] [tab_title]Ingredients[/tab_title] [tab_title]Nutrition[/tab_title] [/tabs_head] [tab]

    • 6 cups shredded cabbage
    • 3 red apples, chopped
    • 1 (5 ounce) can evaporated milk
    • 1/4 cup lemon juice
    • 2 tbsp white sugar
    • 2 tsp grated onion
    • 1 tsp celery seed
    • 1/2 tsp salt
    • 1/4 tsp black pepper

    [/tab] [tab]Yield: 10 servings

    Amount per serving.

    • Calories:53
    • Trace fat
    • Cholesterol: 1 mg
    • Sodium: 26 mg
    • Carbohydrate: 12 g
    • Fiber: 0
    • Protein: 2 g

    Diabetic Exchanges:

    • 1 vegetable
    • 1/2 fruit

    [/tab] [/tabs]

    Directions:
    [tabs type=”horizontal”] [tabs_head] [tab_title]Step by Step Method[/tab_title] [tab_title]Serving Suggestions[/tab_title][/tabs_head] [tab]

    Step 1

    In a large bowl, add apples and cabbage. Toss well and set aside.

    Step 2

    In a small bowl, mix together milk, lemon juice, sugar, onion and celery seeds. Season with salt and pepper. Stir until well combined.

    Step 3

    Pour this dressing over the cabbage mixture. Toss to coat evenly. Cover and refrigerate for 2 hours or until chill. Apple Cabbage Slaw is ready to serve. Enjoy!
    [/tab] [tab]

    Serve with [/tab] [/tabs]

  • Apple Chicken Slaw Recipe

    A quick and easy to prepare coleslaw salad made with Coleslaw mix and leftover cooked chicken. This is a perfect combination for a busy-day dinner. Check it out Apple Chicken Slaw recipe here !!

    [one_third] Prep Time: 10 minutes[/one_third] [one_third]Cook Time: 0 minutes[/one_third] [one_third_last] Servings: 4[/one_third_last]

    [review]

    [tabs type=”horizontal”] [tabs_head] [tab_title]Ingredients[/tab_title] [tab_title]Nutrition[/tab_title] [/tabs_head] [tab]

    • 2 cups cubed cooked chicken breast
    • 2 cups coleslaw mix
    • 1/4 cup poppy seed salad dressing
    • 1 medium apple, chopped
    • 5 tsp mayonnaise
    • lettuce Leaves

    [/tab] [tab]Yield: 4 servings

    Amount per serving.

    • Calories: 266
    • Fat: 14 g (saturated fat: 2 g)
    • Cholesterol: 67 mg
    • Sodium: 193 mg
    • Carbohydrate: 11 g
    • Fiber: 2g
    • Protein: 22 g

    [/tab] [/tabs]

    Directions:
    [tabs type=”horizontal”] [tabs_head] [tab_title]Step by Step Method[/tab_title] [tab_title]Serving Suggestions[/tab_title][/tabs_head] [tab]

    Step 1

    Place salad dressing and mayonnaise in a small bowl. Mix until well combined.

    Step 2

    Place chicken, apple and coleslaw mix in a large bowl. Drizzle with salad dressing. Toss to coat evenly. Apple Chicken Slaw is ready to serve. ENJOY!!

    [/tab] [tab]

    • Serve on lettuce-lined plates.

    [/tab] [/tabs]

  • Aloha Coleslaw Recipe

    A perfect side dish that packs in sweet flavor and crunchy texture! You can also use pineapple tidbits or chunks of fresh pineapple. It’s so simple and tasty coleslaw. Check it out Aloha Coleslaw recipe here!!

    [one_third] Prep Time: 15 minutes[/one_third] [one_third]Cook Time: 0 minutes[/one_third] [one_third_last] Servings: 8[/one_third_last]

    [review]

    [tabs type=”horizontal”] [tabs_head] [tab_title]Ingredients[/tab_title] [tab_title]Nutrition[/tab_title] [/tabs_head] [tab]

    • 1 (15 ounce) can crushed pineapple, drained
    • 1 medium head green cabbage, shredded
    • 1 large carrot, shredded
    • 1 cup mayonnaise
    • 1/2 tsp salt
    • 1/4 tsp pepper

    [/tab] [tab]Yield: 8  servings

    Amount per serving.

    • Calories: 261
    • Total Fat: 22g
    • Cholesterol: 10 mg

    [/tab] [/tabs]

    Directions:
    [tabs type=”horizontal”] [tabs_head] [tab_title]Step by Step Method[/tab_title] [tab_title]Serving Suggestions[/tab_title][/tabs_head] [tab]

    Step 1

    Place cabbage, pineapple and carrot in a large bowl. Stir in mayonnaise. Season with salt and pepper.

    Step 2

    Cover and place in a refrigerator for 1 hour or until chill. Aloha Coleslaw is ready to serve. ENJOY!!!

    [/tab] [tab]

    [/tab] [/tabs]

  • The Perfect Summer Salad: Easy Apple Coleslaw Recipe with a Light Dressing!

    A recipe for Apple Coleslaw is a yummy combo of fruit and veggies in a sweet dressing. Pretty and delicious, too!’
    Check it out Apple Coleslaw recipe here!!

    [one_third] Prep Time: 10 minutes[/one_third] [one_third]Cook Time: 0 minutes[/one_third] [one_third_last] Servings: 12[/one_third_last]

    [review]

    [tabs type=”horizontal”] [tabs_head] [tab_title]Ingredients[/tab_title] [tab_title]Nutrition[/tab_title] [/tabs_head] [tab]

    • 5 cups savoy cabbage, shredded
    • 5 cups shredded red cabbage
    • 2 cup shredded carrots
    • 1/2 cup chopped green onion
    • 1/2 cup mayonnaise
    • 3/4 cup plain yogurt
    • 2 tbsp Dijon mustard
    • 2 tbsp apple cider vinegar
    • 1/2 tsp salt
    • 1/4 tsp black pepper

    [/tab] [tab]Yield: 12 servings

    Amount per serving.

    • Calories: 107
    • Fat: 7 g (saturated fat: 1 g)
    • Sodium: 149 mg
    • Carbohydrate: 9 g
    • Protein:2 g

    Diabetic Exchanges:

    • 1-1/2 fat
    • 1 vegetable

    [/tab] [/tabs]

    Directions:
    [tabs type=”horizontal”] [tabs_head] [tab_title]Step by Step Method[/tab_title] [tab_title]Serving Suggestions[/tab_title][/tabs_head] [tab]

    Step 1

    In a small bowl, combine together the yogurt, mayonnaise, Dijon mustard, cider vinegar, salt, and pepper. Mix well.

    Step 2

    Place cabbages, carrots, green onions, and Granny Smith apple in a salad bowl. Pour dressing over the salad. Toss well to mix.

    Step 3

    Cover and chill at least 2 hours. Apple Coleslaw is ready to serve.

    [/tab] [tab]

    [/tab] [/tabs]

  • Chicken Nachos Recipe

    These chicken nachos are made with tortilla chips layered with seasoned chicken, green chilies and Mexican-style cheese blend. These hearty nachos make a great snack and work well as a meal, too!

    Check it out Chicken Nachos recipe here

    [one_third] Prep Time: 20 minutes[/one_third] [one_third]Cook Time: 20 minutes[/one_third] [one_third_last] Servings: 6 [/one_third_last]

    [review]

    [tabs type=”horizontal”] [tabs_head] [tab_title]Ingredients[/tab_title] [tab_title]Nutrition[/tab_title] [/tabs_head] [tab]

    • 2 skinless, boneless chicken breast halves – chopped
    • 1 (8 ounce) package shredded Mexican-style cheese blend
    • 1 (12 ounce) package corn tortilla chips, or as needed
    • 1 (7 ounce) can diced green chilies, drained
    • 2 tbsp vegetable oil
    • 1 tsp cayenne pepper
    • salt to taste

    [/tab] [tab]Yield: 6 servings

    Amount per serving.

    • Calories: 511
    • Total Fat: 30.3g
    • Cholesterol: 59 mg

    . [/tab] [/tabs]

    Directions:
    [tabs type=”horizontal”] [tabs_head] [tab_title]Step by Step Method[/tab_title] [tab_title]Serving Suggestions[/tab_title][/tabs_head] [tab]

    Step 1

    Place chicken in a large bowl. Drizzle with vegetable oil. Season with salt and cayenne pepper. Marinate for 15 minutes, or longer if desired

    Step 2

    Heat a deep skillet over medium-high heat. Place chicken into the skillet and fry for 10 minutes or until all juices run clear and chicken is no longer pink. Remove from the heat. Keep aside.

    Step 3

    Preheat the oven to 325 degrees F. Arrange tortilla chips in a thin layer of a 9×13-inch baking dish. Place 1/4 of the chicken mixture over the tortilla chips. Add 1/4 of the chilies, and 1/4 of the cheese over the chicken. Repeat layers ending with cheese on the top.

    Step 4

    Bake in the preheated oven for 20 minutes or until the cheese is melted and heated through. Chicken Nachos is ready to serve.

    [/tab] [tab]

    Serve with nacho toppings.

    [/tab] [/tabs]

  • Spice Up Your Life: The Best Thick Garlic Sauce Recipe with a Kick!

    A great way to add extra flavor to stir-fry recipes, particularly seafood dishes. Check it out the  Thick Garlic sauce recipe here !!

    [one_third] Prep Time: 15 minutes[/one_third] [one_third]Cook Time: 0 minutes[/one_third] [one_third_last] Servings: 8 [/one_third_last]

    [review]

    [tabs type=”horizontal”] [tabs_head] [tab_title]Ingredients[/tab_title] [tab_title]Nutrition[/tab_title] [/tabs_head] [tab]

    • 1 head garlic, minced
    • 1 tablespoon sea salt
    • 1/2 cup fresh lemon juice
    • 1 cup vegetable oil
    • 1 cup olive oil (not extra virgin)

    [/tab] [tab]Yield: 1 quart

    • Calories: 123 kcal
    • Carbohydrates: 0.9 g
    • Cholesterol: 0 mg
    • Fat:13.6 g
    • Fiber: 0.1 g
    • Protein: 0.1 g
    • Sodium:165 mg

    [/tab] [/tabs]

    Directions:
    [tabs type=”horizontal”] [tabs_head] [tab_title]Step by Step Method[/tab_title] [tab_title]Serving Suggestions[/tab_title][/tabs_head] [tab]

    Step 1

    Place the garlic, salt, lemon juice, vegetable oil, and olive oil in a quart-sized jar.

    Step 2

    Submerge an immersion blender in the mixture to the bottom of the jar.

    Step 3

    Mix with the blender resting on the bottom of the jar until the ingredients thicken, 1 to 2 minutes.

    Step 4

    Angle the mixer to pull ingredients from the sides of the jar and lift it toward the top to better combine.

    Step 5

    Continue blending until the mixture reaches a texture similar to mayonnaise. Take it out in a bowl. Thick Garlic Sauce is ready to serve. Enjoy!

    [/tab] [tab]

    • It can be used as a condiment on grilled meats, as a salad dressing, and in dishes that require good garlic flavor.

    [/tab] [/tabs]

  • Paprika Wafers Recipe

    Try this Paprika Wafers recipe from a member of the Recipestable Community. It looks beautiful and the sweet and spicy chocolate is a perfect accompaniment to a lovely evening snack with Tea.

    [one_third] Prep Time: 20 minutes[/one_third] [one_third]Cook Time:0 minutes[/one_third] [one_third_last] Servings: 5[/one_third_last]

    [review]

    [tabs type=”horizontal”] [tabs_head] [tab_title]Ingredients[/tab_title] [tab_title]Nutrition[/tab_title] [/tabs_head] [tab]

    • 500 gm white chocolate
    • 50 gm red chilly flakes

    [/tab] [tab]Yield: 5 servings

    Nutritional information is not yet available. [/tab] [/tabs]

    Directions:
    [tabs type=”horizontal”] [tabs_head] [tab_title]Step by Step Method[/tab_title] [tab_title]Serving Suggestions[/tab_title][/tabs_head] [tab]

    Step 1

    Sprinkle  Red Chilly flakes in a any mould of your choice.

    Step 2

    Pour  Melted White Chocolate on it.

    Step 3

    Tap Mould thoroughly to take out air bubbles.

    Step 4

    Top up the mould with chocolate.

    Step 5

    Cool in refrigerator for 15 minutes.

    Step 6

    Demould and arrange on a platter. Paprika Wafers are ready to serve.
    [/tab] [tab]

    • Serve with Tea or a glass of milk.

    [/tab] [/tabs]

  • Fried Corn Balls Recipe

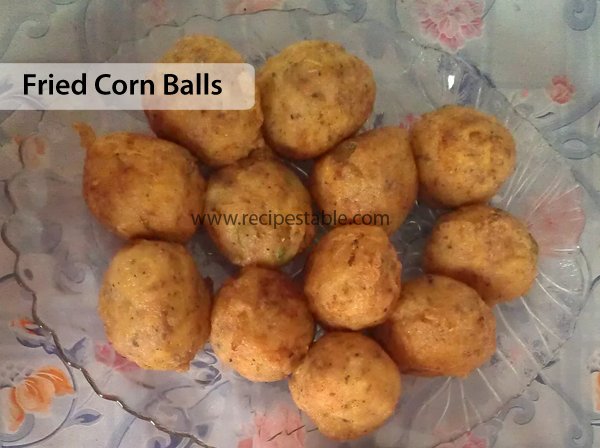
    Fried Corn Balls

    This Fried Corn Balls recipe is a great starter of dipping meal. These bite-size treats are so easy to make. Yummy!!

    Fried Corn Balls Recipe
    Photo: Fried Corn Balls Recipe

    Check it out the Fried Corn Balls Recipe here!!

    [divider]

    [one_fourth]Prep Time:10 minutes[/one_fourth] [one_fourth]Cook Time:10 minutes[/one_fourth] [one_fourth]Servings: 6[/one_fourth] [one_fourth_last]Difficulty Level:Easy [/one_fourth_last]

    [divider]

    [tabs type=”horizontal”] [tabs_head] [tab_title]Ingredients[/tab_title] [tab_title]Nutrition[/tab_title] [/tabs_head] [tab]

    • 1 can (8-1/4 oz) cream-style corn
    • 1 egg, lightly beaten
    • 3/4 cup crushed saltines
    • 1/2 tsp sugar
    • 1/2 tsp baking powder
    • Oil for deep frying

    [/tab] [tab]Yield: 6 servings

    Nutritional information is not yet available. [/tab] [/tabs]

    Directions:
    [tabs type=”horizontal”] [tabs_head] [tab_title]Step by Step Method[/tab_title] [tab_title]Serving Suggestions[/tab_title][/tabs_head] [tab]

    Step 1

    Place egg, corn, cracker crumbs, sugar and baking powder in a large bowl. Mix until well combined.

    Step 2

    Heat oil in a deep skillet over medium heat.

    Step 3

    Drop batter by rounded spoonful.

    Step 4

    Fry for 1 minutes on each side or until golden brown.

    Step 5

    Remove from the oil and drain on paper towels. Fried Corn Balls are ready to serve.

    [/tab] [tab]

    • Serve warm.

    [/tab] [/tabs]

    If you like Fried Corn Balls Recipe and make it then let me know your feedback by commenting below.And if you know more innovative ways in which we can utilize this mouth watering Fried Corn Balls, do share with us and we would be glad to give it a try.
  • A Twist on Tradition: Make Delicious & Easy Brinjal Pakora Sticks!

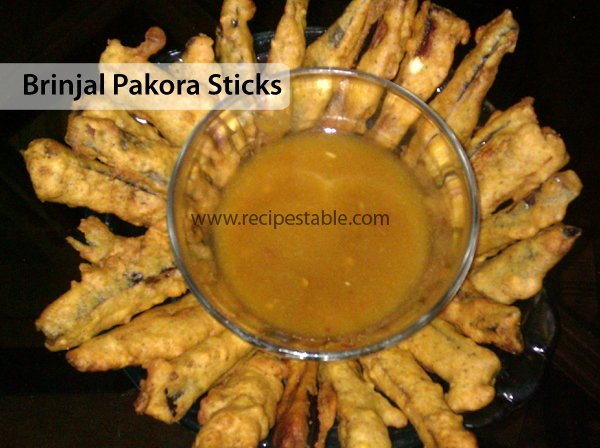
    Brinjal Pakora Sticks

    Crispy and delicious Brinjal Pakora Sticks, the perfect quick evening snack. Tastes wonderful with a chili dip or ketchup. Do try it!!

    Brinjal Pakora Sticks Recipe
    Photo: Brinjal Pakora Sticks Recipe

    Check it out the Brinjal Pakora Sticks Recipe here!!

    [divider]

    [one_fourth]Prep Time:15 minutes[/one_fourth] [one_fourth]Cook Time:10 minutes[/one_fourth] [one_fourth]Servings: 5[/one_fourth] [one_fourth_last]Difficulty Level: Very Easy[/one_fourth_last]

    [divider]

    [tabs type=”horizontal”] [tabs_head] [tab_title]Ingredients[/tab_title] [tab_title]Nutrition[/tab_title] [/tabs_head] [tab]

    • 2 brinjals, cut them into long chip shapes
    • 1 cup gram flour
    • 1/2 cup water
    • 2 tbsp rice flour
    • 1 tsp red pepper
    • salt to taste
    • oil for frying

    [/tab] [tab]Yield: 5 servings

    Nutritional information is not yet available. [/tab] [/tabs]

    Directions:
    [tabs type=”horizontal”] [tabs_head] [tab_title]Step by Step Method[/tab_title] [tab_title]Serving Suggestions[/tab_title][/tabs_head] [tab]

    Step 1

    In a small bowl, make a thick batter with gram flour, rice flour, red pepper, salt and water. Keep aside for 15 minutes.

    Step 2

    Heat oil in a frying pan over moderate heat. Take a slice of brinjal and dip in the batter. Deep fry until crisp and golden brown.

    Step 3

    Put them on paper towels to remove excess oil. If you fry correctly and at right temperature, you will find that it does not retain oil at all.

    Step 4

    Brinjal Stick Pakora is ready to serve.

    [/tab] [tab]

    •  Enjoy with Ketchup or any of your favorite chutney.

    [/tab] [/tabs]

    If you like Brinjal Stick Pakora Recipe  and make it then let me know your feedback by commenting below.And if you know more innovative ways in which we can utilize this mouth watering Brinjal Stick Pakora , do share with us and we would be glad to give it a try.

  • Bundu Khan BBQ Keema Recipe

    Bundu Khan BBQ Keema recipe is versatile and tasty. This BBQ Keema make a very similar taste of famous Bundu Khan restaurant. It’s a perfect warming dish to serve with naan and paratha.Try the easy recipe of Bundu Khan BBQ Keema shown below!!

    [one_third] Prep Time: 10 minutes[/one_third] [one_third]Cook Time: 40 minutes[/one_third] [one_third_last] Servings: 6 [/one_third_last]

    [review]

    [tabs type=”horizontal”] [tabs_head] [tab_title]Ingredients[/tab_title] [tab_title]Nutrition[/tab_title] [/tabs_head] [tab]

    • 1 kg mince
    • 1 medium onion, fried and grinded
    • 2 tomatoes, chopped
    • 4 green chilies, chopped
    • 2 tbsp ginger garlic paste
    • 1 cup yogurt
    • 1/2 cup oil or ghee
    • 1 tbsp red chili
    • 1 tbsp raw papaya
    • 1/2 tsp all spice powder
    • 1/4 tsp kabab chini
    • 1/4 tsp papri powder
    • salt to taste

    For Garnishing:

    • fresh coriander, chopped
    • green chilies

    [/tab] [tab]

    Yield: 6 servings

    Nutritional information is not yet available. [/tab] [/tabs]

    Directions:
    [tabs type=”horizontal”] [tabs_head] [tab_title]Step by Step Method[/tab_title] [tab_title]Serving Suggestions[/tab_title][/tabs_head] [tab]

    Step 1

    In a large bowl, combine together the mince, onion, yogurt, tomato, green chili, ginger garlic paste, raw papaya, red chili, kabab chini, papri powder and salt. Cover and refrigerate for 2 hours to blend flavors.

    Step 2

    Heat oil in a pan and add marinated mince in it. Cook for 30 minutes or until all water dries and oil separate.

    Step 3

    Fry it and give a coal smoke. Then Take it out in a serving dish. Garnish with green chilies and coriander leaves. Bundo Khan BBQ Keema is ready to serve.

    [/tab] [tab]

    • Serve Bundu Khan BBQ Keema along with naan or paratha and salad.

    [/tab] [/tabs]

  • The Perfect Eid Dessert: Make This Easy & Delicious Badam Kheer!

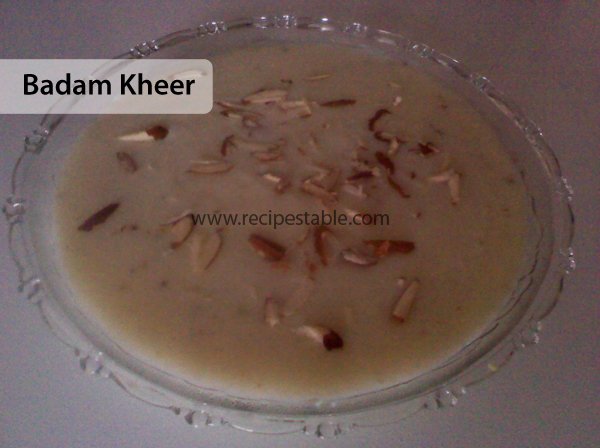
    Badam Kheer

    Badam kheer is a milk based dessert where ground almonds are cooked in milk and sugar and flavoured with saffron and cardamom powder. A must try recipe !!

    Badam Kheer Recipe
    Photo: Badam Kheer Recipe

    Check it out the Badam kheer Recipe here!!

    [divider]

    [one_fourth]Prep Time:5 minutes[/one_fourth] [one_fourth]Cook Time:30 minutes[/one_fourth] [one_fourth]Servings: 2[/one_fourth] [one_fourth_last]Difficulty Level: Very Easy[/one_fourth_last]

    [divider]

    [tabs type=”horizontal”] [tabs_head] [tab_title]Ingredients[/tab_title] [tab_title]Nutrition[/tab_title] [/tabs_head] [tab]

    • 1/2 cup Almond (Badam)
    • 2 cups Milk
    • 3 tblsp Sugar
    • 5 crushed Cardamoms
    • a pinch of Saffron, soaked in lukewarm milk

    [/tab] [tab]Yield: 2 servings

    Nutritional information is not yet available. [/tab] [/tabs]

    Directions:
    [tabs type=”horizontal”] [tabs_head] [tab_title]Step by Step Method[/tab_title] [tab_title]Serving Suggestions[/tab_title][/tabs_head] [tab]

    Step 1

    Boil half a liter of water in a sauce pan .

    Step 2

    Add the almonds when the water is boiling and cook for 2 minutes. Remove from the flame and drain.

    Step 3

    Remove the skin of the almonds and grind to a fine paste.

    Step 4

    Meanwhile, boil the milk in a thick bottomed pan.When the milk begins to boil add the almond paste and the sugar.

    Step 5

    Cook for 5 minutes over a low flame stirring continuously until thickened. Remove from the flame.

    Step 6

    Add the dissolved saffron and the crushed cardamoms. Allow to cool. Badam Kheer is ready to serve. Enjoy!

    [/tab] [tab]

    • Serve chilled with any meal.

    [/tab] [/tabs]

    If you like Badam Kheer  Recipe  and make it then let me know your feedback by commenting below.And if you know more innovative ways in which we can utilize this mouth watering Badam Kheer , do share with us and we would be glad to give it a try.